
PRE COMMISSIONING TEST ISOLATORS
Purpose
This procedure is prepared to carry out various pre-commissioning tests to be conducted in systematic manner for isolators to ensure the healthiness and performance of the equipment
Scope
This procedure covers the Pre commissioning test for isolators as for the following
Operation checks
- Insulation Resistance Test
- Contact Resistance Test
- Isolator Motor winding IR Test
- Measurement of operating timing
- Interlock with earth switch and circuit breaker
Tools and Equipment Required
For Insulation Resistance measurement Test (IR Test):
- 500 V, 5000 V Insulation Tester
- Test Leads
- Insulated Hand Tools
For Contact Resistance measurement Test
- Contact Resistance meter kit with test leads range of 200µΩ-2000µΩ
For motor winding resistance test
- Multimeter with test leads
For motor insulation resistance test
- 500/5000V insulation resistance tester/ IR KIT
- Test leads
Operational Sequence of work(Test Procedure)
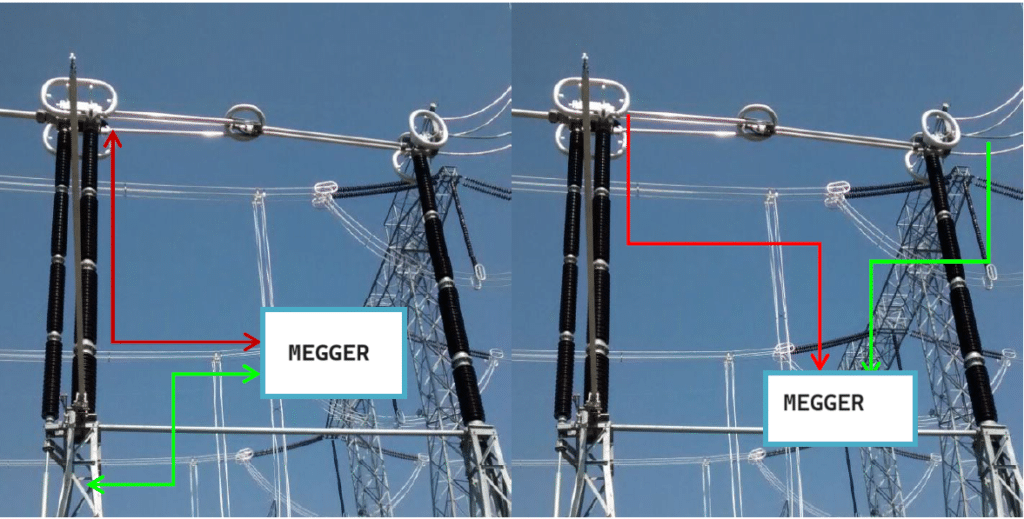
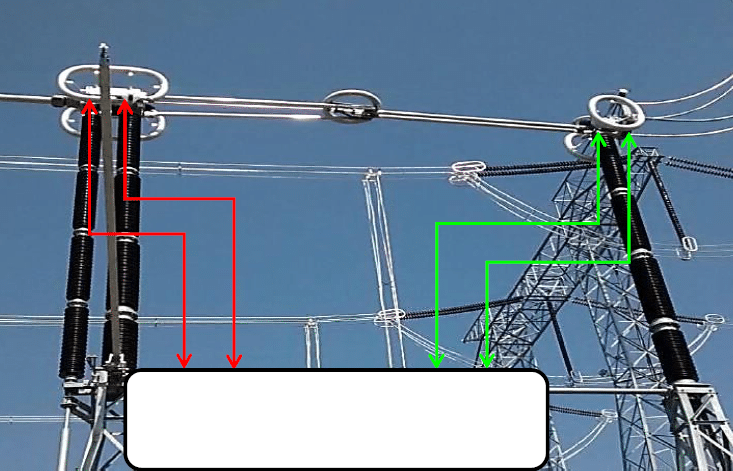
Insulation Resistance (IR) Test – isolators
- Take the work permit from the client
- Test equipment’s to ensure zero energy state before beginning the work
- Ensure the isolator in close positions
- Connect the 5000 V IR kit positive lead to isolator pole
- Connect the earth lead to the earth
- Switch “ON” the 5000 V IR kit and press the test button note down the readings
- Connect the positive lead to one pole and negative lead to another pole when isolator in open position
- Switch “ON” the 5000 V IR kit Inject the voltage and note down the readings
Motor Winding IR test (using 500V IR kit)
IR TEST BETWEEN PHASE TO PHASE:
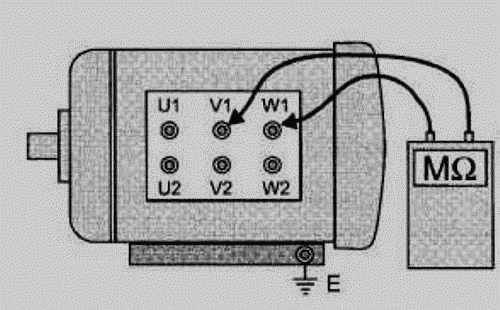
- Connect the IR kit across the motor Terminal “U1 & V1”
- Switch ON the IR kit and press the test button take down the readings
- Discharge the potential from the “U1 & V1” terminal with respect to earth
- Switch OFF the IR kit
- Repeat the above steps for other Terminals (V1 & W1), (W1 & U1)
IR TEST BETWEEN PHASE TO EARTH:
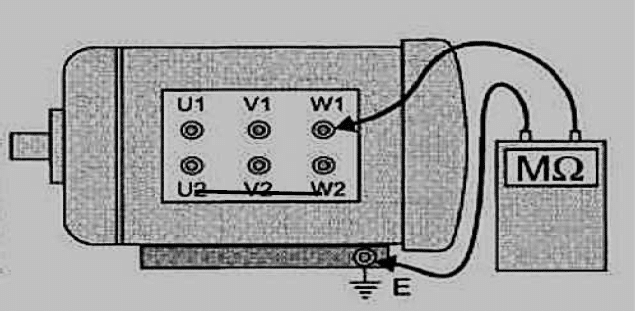
- Looped (Shorted) the motor Terminals U2, V2 & W2
- Then Connect the IR kit across the motor Terminal “U1” & Earth
- Switch ON the IR kit and press the test button take down the readings
- Discharge the potential from the “U1” terminal with respect to earth
- Switch OFF the IR kit
- Repeat the above steps for other Terminals V1 & W1
| Do’s | Don’s |
|
|
Contact Resistance Measurement Test
- Take the work permit from the client
- Test equipment’s to ensure zero energy state before beginning the work
- Connect CRM kit across the Moving & fixed Contacts of Isolators while Isolators in Close Condition
- Voltage lead to be with the current lead region
- Switch “ON” the CRM kit and test press the test button take down the readings
Measurement of operating timing:
- Keep Isolator in Open Condition.
- Give close command and start the stop watch.
- Stop the stop watch after isolator closed and note the closing time.
- Keep the isolator in closed condition
- Give open command and start the stop watch
- Stop the start watch after isolator open and note the opening time